Dope Sheet
 The dope sheet is used when creating animations. It shows the timelines, keyframes, and other information contained in the current animation.
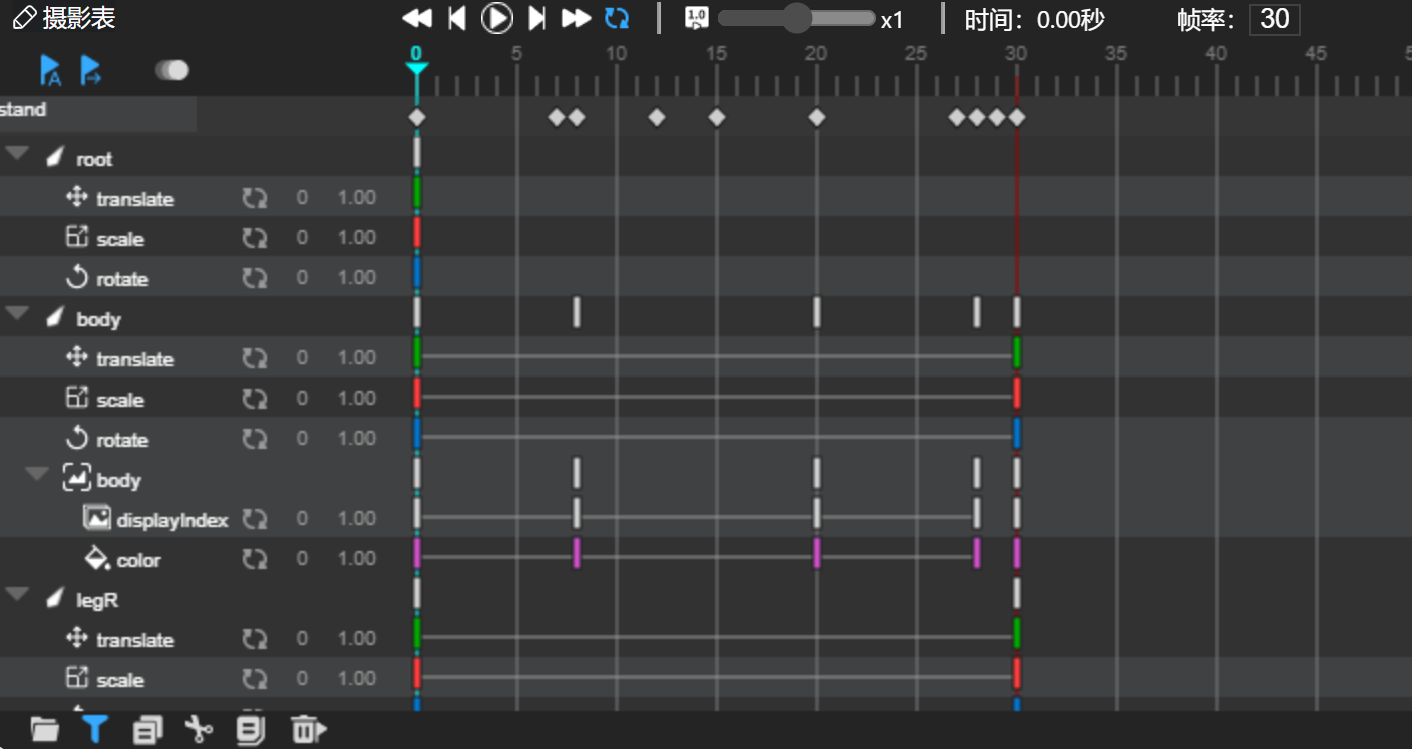
The dope sheet consists of several parts: the top toolbar, the left toolbar, the time ruler, the tree-structured timeline, and the bottom toolbar.
- Top Toolbar
- Playback control buttons: from left to right: go to frame 0, move one frame left, play/pause, move one frame right, go to the last frame, toggle loop playback.
- Playback speed control: from 0.1 to 10
- Time: the current time position of the playhead
- Frame rate
- Left Toolbar
- Auto keyframe: When enabled, if there are changes to properties that can be keyframed, keyframes will be automatically added at the playhead's position. If a keyframe already exists, its value will be modified.
- Auto first frame: When adding a keyframe to a property for the first time, if the added keyframe is not at frame 0, a keyframe will automatically be added at frame 0.
- Onion skin tool: Click to enable the onion skin tool, click again to disable it.
- Time Ruler: The time ruler has scales and a playhead
- The scale unit is frames. Clicking on the ruler changes the playhead position. Use the mouse wheel to zoom in and out of the ruler.
- The playhead indicates the current time point of the animation. When the playhead changes, the display on stage will also change.
- When the onion skin tool is enabled, onion skin markers appear on both sides of the playhead, indicating the range of the onion skin. Use the mouse to drag and modify the range of the onion skin.
- Tree Timeline: The timeline is divided into left and right sides. The left side displays the names of objects or properties on the timeline. The right side displays keyframes and animation curves.
- The first row on the left is the animation name, and the right side shows the positions of all keyframes
- Starting from the second row are the timelines for each object or property, with names or properties on the left and keyframes on the right
- Keyframes can be selected by clicking or using box selection.
- Selected keyframes can be dragged with the mouse to change their positions.
- Selected keyframes can be copied, cut, or deleted using the buttons on the bottom toolbar.
- If using box selection, you can scale the selected keyframes to change their positions collectively, effectively modifying the animation speed.
- The lines between keyframes represent animation curves, showing whether the curve is a straight line, a curve, or no animation curve.
- When a keyframe is selected, the curve panel shows the specific shape of the curve after that keyframe, which can be modified.
- A red vertical line indicates the position of the last frame of the animation.
- Bottom Toolbar
- Collapse/expand button: Collapses or expands the timeline.
- Filter button: When enabled, the timeline only displays timelines related to the selected object; others are hidden. When disabled, all timelines are shown.
- Copy keyframe button
- Cut keyframe button
- Paste keyframe button
- Delete keyframe button
- Timeline scrollbar: Appears when not all keyframes can be displayed on one screen. Can be used to adjust the range of the currently displayed timeline.